How to Make a Simple and Beautiful DIY Plant Wall

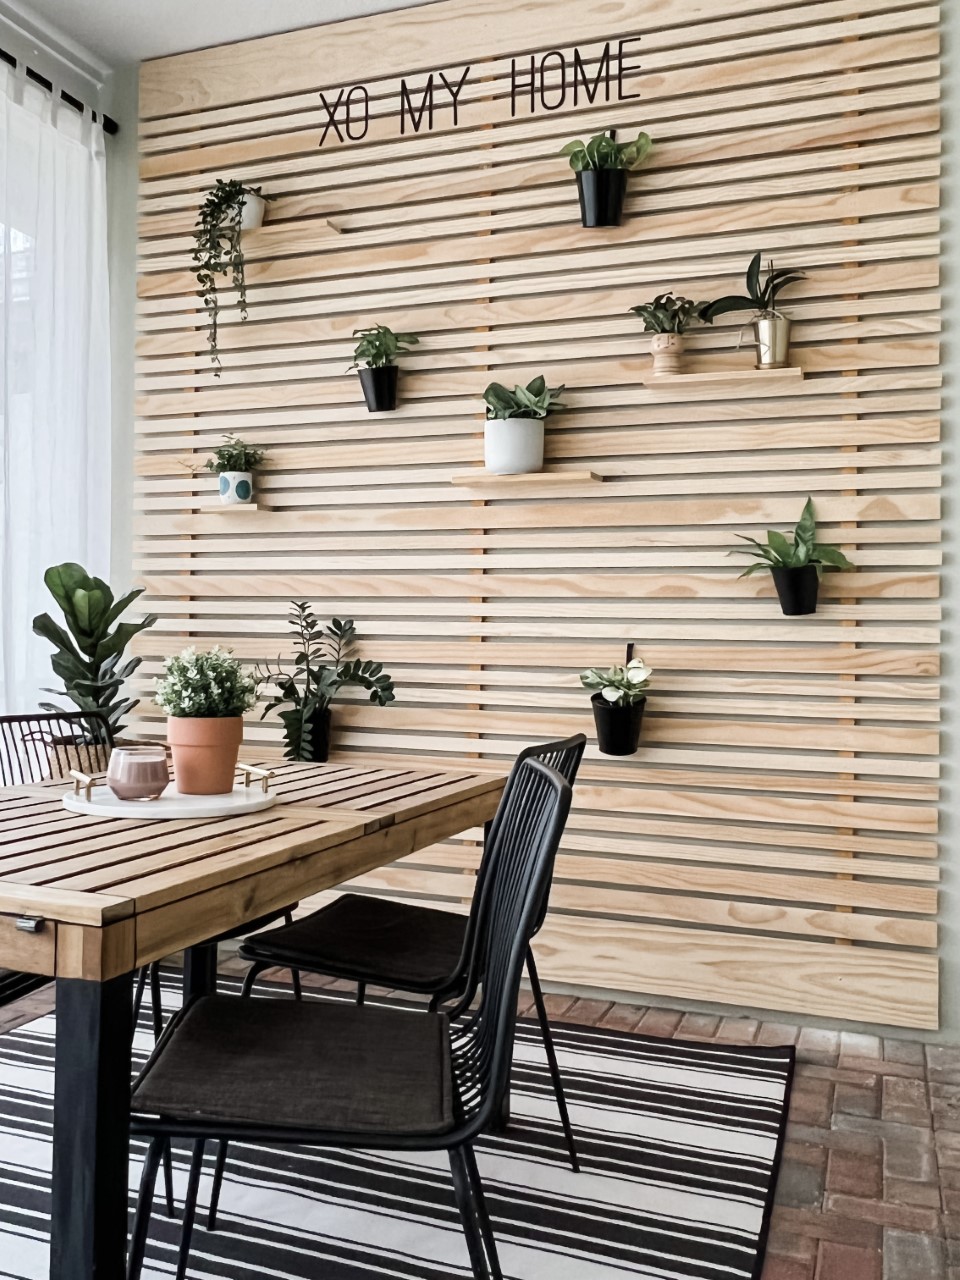
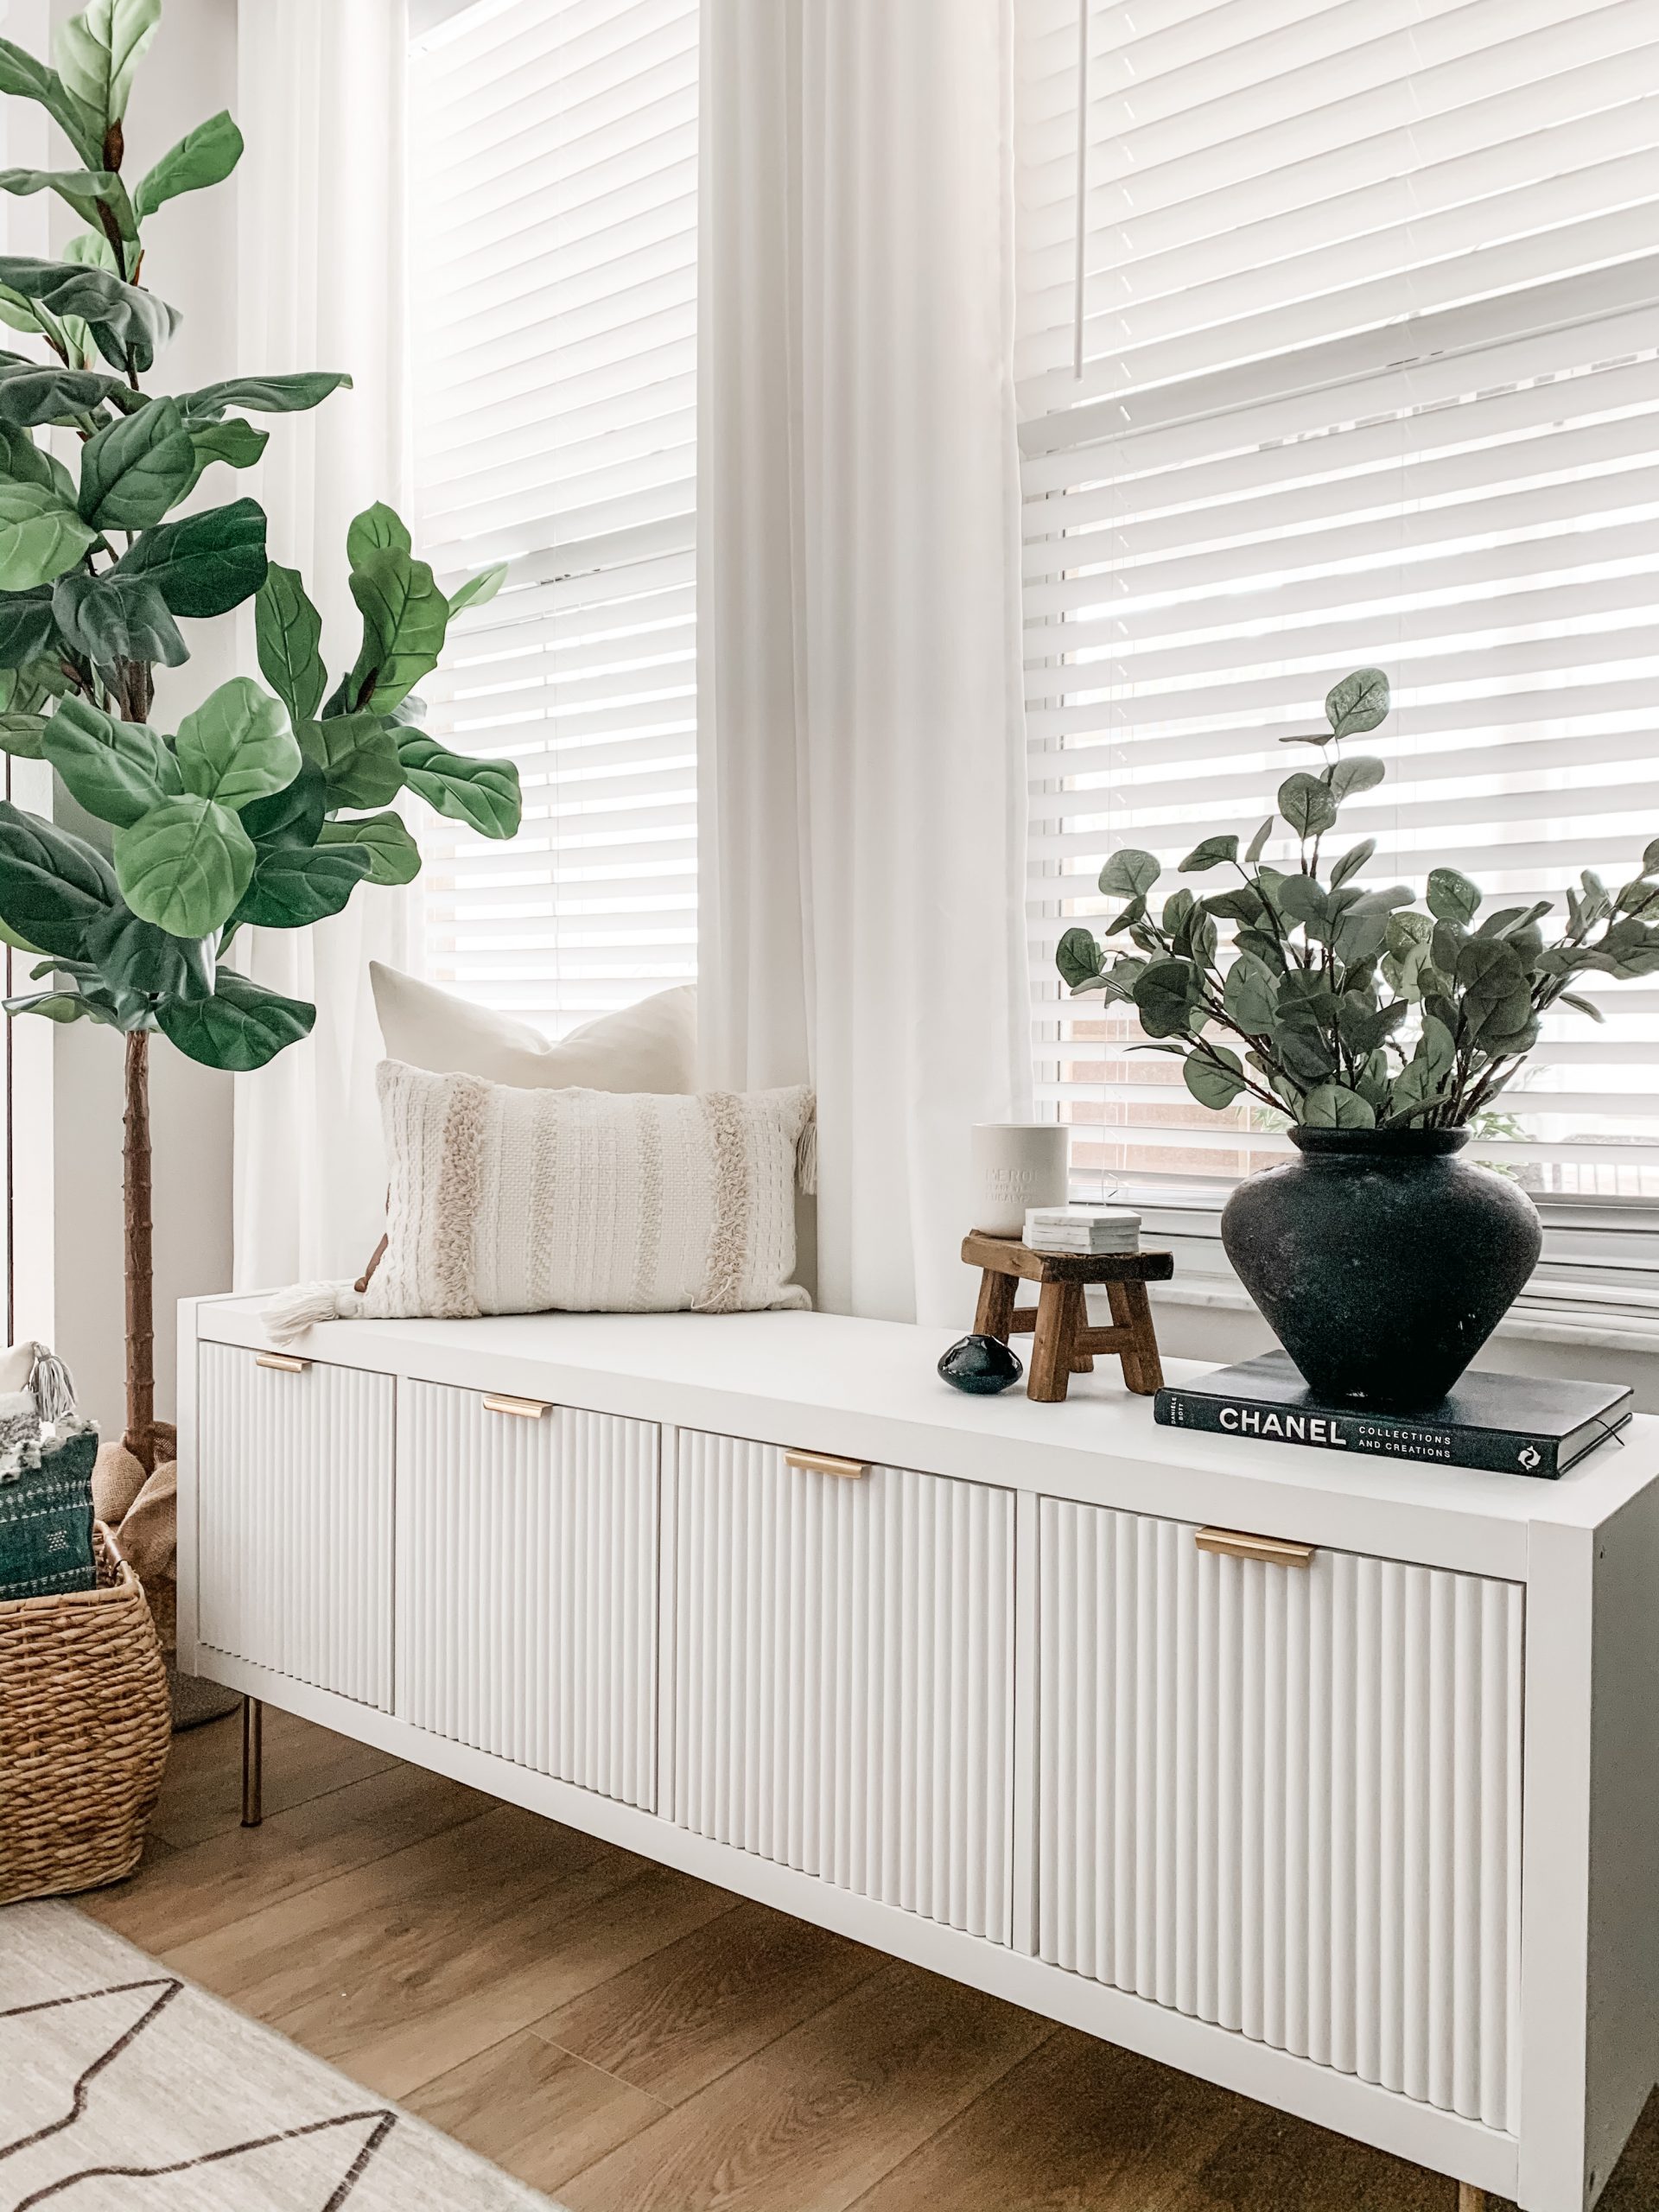
I have a small backyard with a small Lanai (screened in back porch) that lacks any character and charm so it is often unused and wasted space.  So I decided to add this simple and beautiful living plant wall DIY to be the focal point of an outdoor dining/lounge…

Three ways to Quickly Clean Out Your Email Inbox

My First Unflattering Task of The Year

If you have been here awhile, you know I’m always decluttering and reorganizing. First, I’d like to make it clear that in no way is my home perfectly organized and pristine all the time. Let’s be real here, I am a working mom of 3 young kids who loves to drag their tiny pieces of Legos all over the house. And no matter how many times I remind them to eat over the plate, it NEVER sticks!

I’ve always been that person who is easily impacted by clutter. Visual clutter often results in mental clutter for me. I find myself easily feeling overwhelmed and not as productive when things are out of order, so it’s important to me that everything has a place.

Decluttering Your Email Inbox

However, the first thing I decluttered  in 2022, was actually NOT a space in my home but my email inbox. Digital clutter has definitely been adding stress to my life, from the photos on my phone to documents on my laptop.  My personal inbox was a hot mess! I was getting so many retail and spam emails that I was losing track of emails from the kids’ teachers and other parents. 

So, on January 2, I set my phone alarm to 30 minutes, got comfortable on my parent’s couch and went through my inbox. Any email that I no longer wanted to receive, I would scroll to the bottom of that email and looked for the unsubscribe button and follow the steps required. Honestly, within 20 minutes, I started coming across the same brands over and over so I just deleted the emails. You only have to unsubscribe once. Most companies specify that it will take a few days for your unsubscription to be finalized. It’s been a few days now and OMG, my inbox is so much more manageable now. I also make a point to unsubscribe to any new email coming from brands I don’t recall seeing on the 2nd. I am no longer sifting through email after email trying to decipher whether it is important or not. So, if you are like me and find that you’re struggling to stay on top of your inbox, I would highly suggest you set that timer, put your head down and go at it with the unsubscribe button. Just make sure you’re not unsubcribing to me 😉 cuz you know, I bring tons of value to the table. Besides I rarely send out any emails, LOL. I also need to sort through tens of thousands of photos I have on my phone, and all the documents I have on my computer. I’ll address that soon so stay tuned. If you are looking for ways to stay on top of your schedule and tasks, I absolutely love this planner. I have used this planner for a few years now. I just get a new one each year. This year it sold out so fast but I kept checking until it finally came back in stock.  I find that  For tips and ideas on how to organize your home, check out this kitchen organization post. 

Kitchen Decluttering and Reorganization

Empty, Clean, Sort & Discard and Reorganize.

It always feels good to start the year fresh. So for today’s reorganization task, we’ll focus on a physical space so let’s start with the kitchen. When cleaning and reorganizing, I always follow these steps: Empty; Clean; Sort and Discard; Reorganize

1. Refrigerator:

  • Empty the contents of your fridge,
  • Clean: Wash all the drawers and wipe down all the surfaces.
  • Sort through all the items and check the expiry dates. If it’s expired, toss it! If you haven’t used it in 3 months, it’s time to say goodbye. If it looks or smells funny, probably NOT a good idea to consume.
  • Reorganize: I like to use organizing bins to organize the content before I return it to the fridge. This way, there is a place for everything and helps keep your fridge looking organized throughout the year.

2. Pantry:

  • Follow the same steps as cleaning your refrigerator.
  • For the pantry, I find food storage containers so useful for several reasons. It keeps your food fresh longer. It allows you to easily identify where everything is. It also makes it easier for you to determine when you are running low on certain items rather than keeping it in the bag or box. Now I know a lot of you worry about not knowing when something expires when you empty it from the bag/box. I have a label for each of my containers and I use chalk to label it with the name of the content and expiry date. Problem solved. For items that I cannot empty into a container, I group using baskets. Canned foods all go in one basket, Kids apple sauces in another.

3. Drawers and Cabinets:

  • Empty, Clean, Sort & Discard and Reorganize. Any pots and pans you haven’t used in a while, perhaps pass it on to someone that might get better use of it. And if you’re like me and keep your toaster in the drawers, then vacuuming and a good wipe will set the year off right.
  • I like to use this lid organizer for my Tupperware. It keeps all the lids together and allows me to stack the Tupperware making more space in my drawers. The same thing applies to the lids for my pots and pans.
  • One of my favorite purchases last year is a bottle organizer. We have many water bottles in the house between the five of us and those take up a lot of space. This bottle organizer neatly fits into my cabinet and allows me to stack my bottles keeping them organized and accessible.

4. Junk Drawer:

  • We all have one of these in our kitchen. In my case I have almost 2. Again, Empty, Clean, Sort & Discard and Reorganize. Time to get rid of those loose hand-written notes, random business cards that you never called and old birthday candles that you never reused.
  • When it comes to organization, I like to group everything. I use drawer organizers to do so. This way, there is a place for everything. If there is not a place for it, then it either does not belong here and you need to find a home for it somewhere else, or you no longer need it so bid it adieu.

I hope you found that helpful. If you 

How to Create Simple yet Elegant Box Molding

My parents have lived in their home for over 20 years. Other than paint, not many changes were made to their house.  This year, they finished their basement so there would be extra space for my kids to hang when we visit. How sweet is that!


Holiday Gift Idea

I was strugging to find a gift for them this Holiday season, which I do every year. They are the kind of parents that NEVER want their children to “waste” money on them. I know they have talked about updating their house for awhile, but since nothing is “broken”, they will wait a bit longer. My parents’ house may be a tad dated, but everything is in phenomenal condition, so who knows when that will be! While I was lying on their couch sick one day (during our trip to Toronto over the holidays), I came up with the idea of gifting them a little update to their home. I decided to create box molding on their living room walls. I thought it would be a fairly easy project that I could tackle in a few days while creating a huge impact. So I texted a few family members to see what tools I could borrow and off to Home Depot I went. 

Supplies:

Tools:


Before:

Tutorial:


1.     First, determine the design you want. I chose to have a large rectangular box on top and then a smaller box underneath. 

2.     Then measure the wall(s) to determine height and width of the wall(s).

3.     Determine the size of the boxes you wish to build (based on preference). My layout provided below. 

4.   Optional but recommended: Use painter’s tape to tape the size of the boxes on the wall. This takes the guessing game out of the project. Once the tape is on the wall, you make changes based on your personal preference. 

5.     Create a cut list (eg. 8 x 57″)

6.     Using a miter saw/miter box to cut your trims at a 45 degree angle. Label and group them together so you don’t mix them up later during installation. This makes the process a lot smoother when nailing into the wall

7.     With a nail gun, start installing your trims. If you have a laser level, this would be a great opporuntiy to bring it out. If not, a manual level works just fine. Start with the top trim and work your way from one side of the wall to the other.  My parents live alone.  My nieces and nephews are older so there is no concern with someone trying to pull the trims off the wall. If this is a concern, you can nail the trims to studs. But in our case, the 1 ¼” nails plus caulking is sufficient to hold the trims in place. 

8.     Once the trims are installed, it’s time to fill in those nail holes with wood filler. 

9.     It’s all in the details. One the nail holes are filled, I caulked around the edges of the trims (both on the ouside and inside) so there aren’t any visible gaps. 

10.   Once everything is dry, I painted it with 2 coats of Behr Whispering White in a matte finish. It instantly made the room feel larger and the ceiling taller.


This entire project took me 2 days to complete, from start to finish. I even did the wall opposite to the one in the picture below. 


AFTER:

Total Cost (for this wall):


US Cost:

Trims: 11x 4.10 = $45.1

1 can of paint: $41.98

Wood filler – $5.38

Caulking – 3.48

1 ¼” brad nail – 6.98

Total: $102.92 + applicable taxes


Canadian Cost: 

Trims 11 x 12.80 = $140.90

1 can of paint = $57.95

Wood filler = 5.27

Caulking – $3.54

1 ¼’ brad nail – $7.48 (only 1/5 of it)

Total: $215.14 plus taxes


I am so happy with how this project turned out. It completely transformed the space. My parents are very practical people, so this is not something they would typically spend money on. However, they love how it looks and I am thrilled I was able to do this for them. In the end, this made a fantastic Christmas gift for them.  This is a fairly easy DIY project. if you are looking for more DIY projects, check this project and this project. If you try this, let me know how it goes.

Holiday Gift Guide for the Dressy Casual Guy

This Gift Guide for Him is 100% curated by the hubby. I don’t know if you girls can shop for your husband/partner or not, but I definitely can’t. He has very specific taste and is all about fit and quality. So I thought since you were all interested in a gift guide for him, why not have him write what he thinks are great gifts lol. So before I share the guide, let me preface this by saying that he is a more tailored suited or dressy casual kind of person that prefers classic looks that will last. So let’s jump into it!

Jackets and Sweaters

Here are three jackets he absolutely loves. First up is a Parka. He does not have this Parka since we live in Florida but the minute we move back to Canada, I know it will definitely be in his wardrobe. It is on the sleeker side for a Parka, so if you are looking for a warm jacket, with less of the puff you often see in a Parka, this is it! Second, is your classic peacoat. He has had this for a few years now and loves it. It’s currently 40% off with code ‘family’ which brings it to just under $200, which is a great deal, so run. The third coat is a waxed coat, a classic piece that will live in his wardrobe forever. 

You can never go wrong with gifting a quality sweater/cardigan. If you are looking for a wool one, this is a great option. This is also a beautiful alternative that is 100% cotton. 

Shop Jackets and Sweaters

Shoes

Here are a few of his favorites. This is his all time favorite boot, although technically a work boot, it is on the dressier side. Here is a more budget-friendly alternative. If you are looking for a dressier sneaker, this is a great option. 

Shop Shoes

Accessories

Watches: If you are looking for a quality watch to gift, this Field watch is a great option from Hamilton, an established n Swiss brand. Now if you are looking for something a little dressier, this automatic stainless steel Tissot with integrated bracelet is a showstopper.  Here is the same watch but with a quartz movement that is almost half the price. Now, if you’re buying a watch for someone that is into watches, the hubby says you should definitely get the automatic movement! For a more everyday sporty and budget friendly look, this G-shock packs a ton of bang for the buck. 

Here are a few accessories that would make great gift items. First, this twill briefcase is great quality with a more casual look but the bridle leather straps elevate the look. Socks are always a fun gift that make a great stocking stuffer. You can’t go wrong with a good looking scarf and this herringbone scarf is so stylish. If your hubby/parter is more minimal, he will most likely appreciate this wallet. And for the frequent traveler, this is a great travel wallet that will hold all their cards, passports, tickets and more. If he doesn’t already have airpods, then what a great gift to give. If he does have one, then these airpod cases are such a nice touch and would also make great stocking stuffers. 

Shop Accessories

Shop This Post

Our Family Trip to California

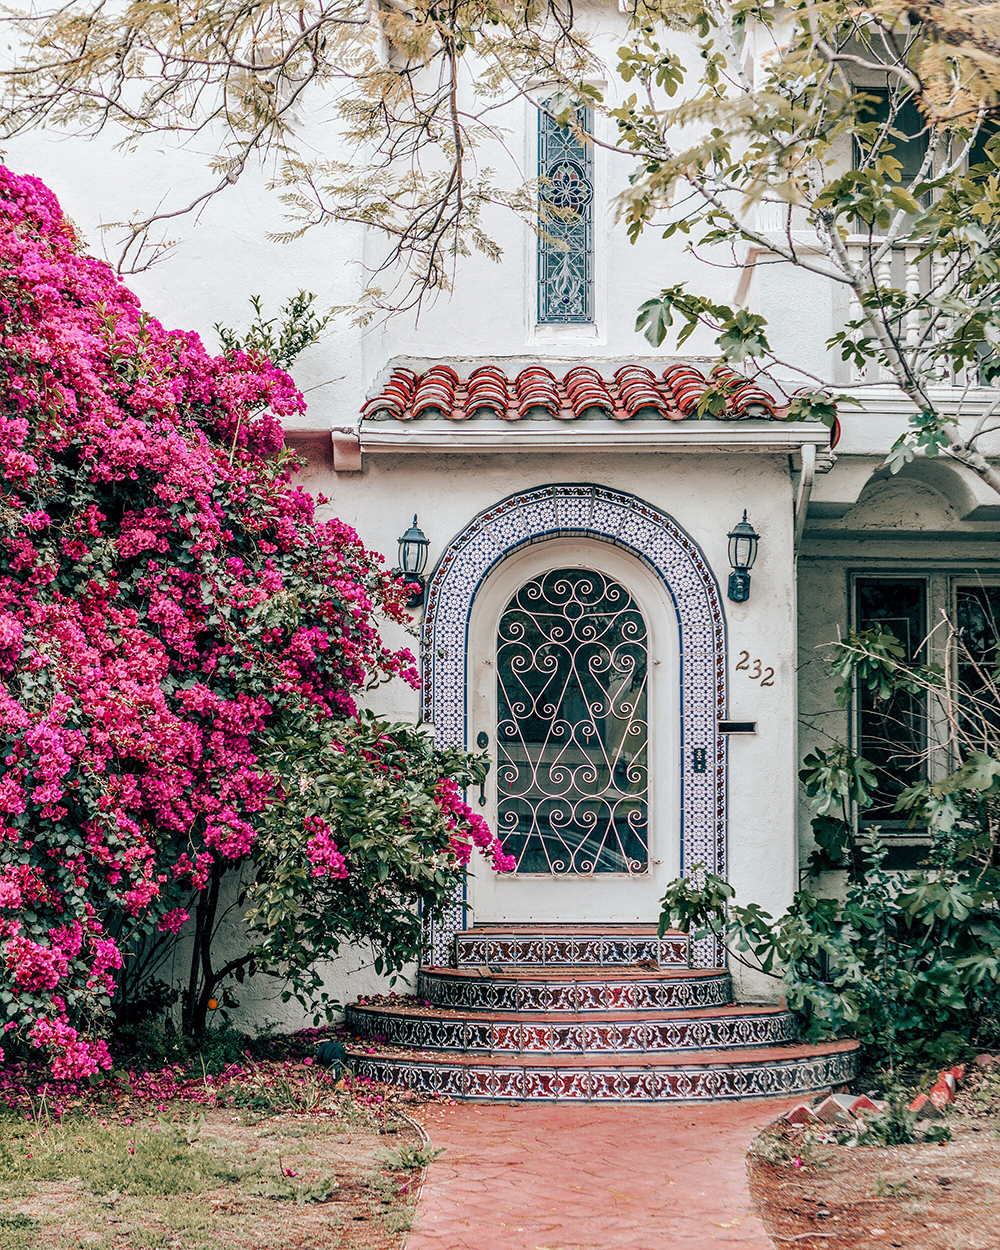
I’m keeping this quick and simple and sharing exactly what we did on our trip to California. Day 1 to Day 3 After we landed in LAX, we grabbed our rental car and made our drive towards Palm Springs. This trip was one day after we returned from Toronto…

Best Ikea Hack: Ikea Kallax into a Fluted Media Console

I know this post should have been done awhile ago, but better late than never right? I know many of you have already attempted this project by referring to my tutorial saved in my IG highlights

So here it is! This is how I turned my extra Ikea Kallax into a beautiful fluted Media Console.

Materials:

  1. Ikea Kallax
  2. Ikea Kallax Inserts
  3. Fluted Trims
  4. E6000 glue
  5. Caulk
  6. Mitre Saw
  7. Edge knobs
  8. Brass Legs
  9. Linen White Chalk Paint
  10. Polycrylic Matte Finish

This project began because I was reconfiguring the boys’ playroom, getting it ready for virtual learning last year during the pandemic. I ended up with an extra Ikea Kallax as there was no space for it in the playroom once I added a desk. Temporarily, I placed it in my living room under the TV with storage baskets and used it to hide my baby girl’s toys. It became a functional piece for us but aesthetically, it did not fit into our space. I stared at the unit for weeks. I kept thinking there must be something I can do to it, to make it blend into our home a little better. That was also the time when the fluted trend took off so fluted vanities, fluted dressers, pretty much fluted everything was everywhere so I decided to go with it and give it a try. 

Instructions:

  1. I used my Mitre saw to cut the fluted trims to the height of the door. For 4 doors, I used just under 3 of the trims I purchased (they were each 8ft long). I did put through 4 cut trims though my table saw to get a thinner piece to glue to the end of each door. You can probably do this with a mitre saw or a hand saw as well. 
  2. I used liquid nail and clamps to secure the trims to the door. However, I think E6000 or gorilla glue probably would have been better.
  3. I installed the legs I got from Pretty Pegs. For the front legs, I suggest installing it about 1/2 – 1 inch away from the front of the console so the black metal plate is hidden. I had to redo mine because the first time, I installed it right at the corner and the black plate was very visible.
  4. Once the glue was dried, I caulked the gap between the trims for a more finished look. 
  5. I began installing the door (Kallax insert with the fluted trims) to the Ikea Kallax using the instructions provided by Ikea as a guideline. I did adjust the location of the hinges so that the door would not stick out (remember, the door is now thicker because of the added trims).
  6. Once everything was done, I used chalk paint and painted the entire unit (except the bottom) because no one was going to see that. I painted 1 thick coat but you can do 2 if needed.
  7. Once the paint was dried, I sealed it with 2 coats of Polycrylic matte sealer.
  8. Finally, for the the last step, I installed the edge knobs to complete the unit and voila!
 

Cost Breakdown: 

I had the Ikea Kallax already along with many of these items listed so my cost was lower than if you had to get all of these materials.  I also have power tools for various projects so I will not factor that into this cost breakdown. 

  1. Ikea Kallax x 1 = $50
  2. Ikea Kallax Insert x 4 = $69
  3. Fluted Trims x 3 = $42
  4. E6000 Glue x 2 = $10 I used Liquid nail but I think you would probably need 2 tubes of E6000 glue.
  5. Caulk x 1 = $3 with plenty extra
  6. Edge knobs x 4 = $28
  7. Brass legs x 4 = $60
  8. Chalk Paint x 1 = $14 with plenty extra
  9. Polycrylic x 1 = $12 with plenty leftover
Total cost if you had to get everything without power tools: $288. A very similar looking unit at West Elm sells for $1500. Now my total cost was just over $200 I assure you, this unit once completed looks a lot more expensive than $300.

If you missed it, I also used the same fluted trims on my Ikea Hemnes dresser and the result was just as beautiful. You can check it out here. I also made over an Ikea Rast nightstand that can be found here. 

XO, 

Kim 

4 Items to Keep School Supplies Organized

Last week, I shared one of the tools that has really helped me keep our boys’ school supplies organized in my Instagram Stories. I forgot to share the link and within minutes, I received over 50 DMs from moms asking me for the link. Immediately, I knew that this was a problem not just for me but for so many others as well. 

I tried the cute way of storing my kids’ supplies, such as baskets for their crayons, trays for the papers and it was simply not working out. For the most part, their school supplies would be scattered all over their desk, on the floor, in their lego boxes, simply just a pile of mess everywhere. I knew we had to switch it up. Here are 4 things I use to organize their school materials and have really helped keep everything in check. 


  1. Stackable Pencil Boxes: I sort all their markers, crayons, pencils, glue…into different boxes. Each box is labeled. Whenever the boys need something, they will grab the box(es) they need, use it and then put it back. They stack on top of each other, taking up very little space. 
  2. Individual crayon/snack boxes: I use these to store little knick knacks such as paper clips and thumb tacks. I also use this to store one box of crayons to put in each of the boys’ pencil box for school. I learned this from my oldest’s first grade teacher last year. This way the crayons are in a separate container within the pencil box making it easier for them to access everything else they need. 
  3. I use these bins to store their school books eg. math/science book, magazines along with their note books.
  4. This bank box helps keep their loose activity papers, artwork and random papers they have sorted and neatly put away.  When it gets full, I go through them and discard what they no longer need.  
 

You’ll noticed that these boxes are all clear, making it easy to see what is inside them. This helps them quickly grab whatever they need to start their school day. 

I hope this system works for you. Also, this is not just for the distant learners, since they are also great to store kid’s supplies in general if your kids enjoy arts and crafts. Keep up the good work! You are doing great!

Shop This Post

Ikea Rast Nightstand Hack

My media console and nightstand Ikea hacks were definitely my most popular projects of 2020. If you missed it, you can see it here. This year, my plan was to kick off the year with a bedroom refresh as I have shared in my 2021 Project list. I was on the hunt for 2 new nightstands but during an IG poll, most of you wanted to see another Ikea hack. So here it is!

I searched Ikea looking for something that I could transform. I came across the Ikea Rast and thought it would be a great nightstand to work on. It is affordable, coming in at $39.99. It is made of solid pine and has 3 drawers, so plenty of storage. You can NEVER go wrong with storage, especially when you live in a smaller home. 

I didn’t really have a plan for this nightstand. I thought I would figure it out along the way and have you help me determine how this nightstand would look. I did a series of polls in my IG stories and the end result is based on your votes. You all rock! 

After putting the nightstand together, I knew I didn’t want the toekick at the bottom and wanted to reinforce it with a base under the drawer. I also wanted a top shelf for some books and decorative pieces. 

To do so, I: 

1. Determined where the last drawers ended on the nightstand. I made a mark and then used a speed square to draw a line across the nightstand. 

2. I took the nightstand apart so I can measure and cut the side panels. 

3. I then accounted for the 1/2″ plywood that I used. I added 1/2″ plus a little and drew a line below my original line (where the drawers ended). 

4. Once I determined where I needed to cut, I used my circular saw with a Kreg guide to cut each of the side panels. 

5. I then measured the width and depth of the nightstand to determine the base I would need to reinforce the bottom of nightstand. (This should equal the top panel of the nightstand so I measured that to make sure my measurements weren’t off).  

6. Using the circular saw plus Kreg guide, I cut the plywood to the determined dimension. I cut 2 pieces of wood, one for the base and one for the shelf. The piece of plywood I used will give you 4 pieces which is perfect for 2 nightstands. 

7.Then using my Kreg Pocket hole jig, I added 4 pocket holes to the bottom of each piece of wood that I had cut. 

8. I reassembled the nightstand. 

9. Using 1/2″ pocket hole screws from my kit, I secured the pieces of wood to the nightstand. One at the bottom, under the last drawer and one right above the second drawer. This now leaves the first drawer empty to be used as a shelf. 

So that gave me the structure I wanted for the nightstand. Now, I wanted to add some details to the front of the drawer. I had a few options in mind but this vertical board look stole your hearts, so I took a walk around Lowes and decided that lattice trims were the way to go. They are thin, which makes them super easy to work with and also will have little impact, if any, to the profile of the dresser. 

To create the design: 

1. I purchased 4 of these pine lattice trims from Lowes or you can also get 3 of the 10ft lattice trims. This would be enough for one nightstand (2 drawers).

2. I measured the height of each drawer front, then cut the trims to the right length. 

3. Using wood glue, I glued the trims to the front of the drawers. I used nickles as my spacer. (One thing I would recommend is laying out all the trims on the drawers with the spacers before applying the glue so you can see how many pieces you need. This also allows you to adjust the spacing to ensure that you have full pieces of the trim for the entire drawer). I missed this step and ended up with a slither in the end. It does’t look bad but would definitely be a cleaner look if I had spaced out the trims a bit better. Another tip I have is to complete one drawer first. Put the drawer back into the nightstand. Apply the first trim to the second drawer and then immediately (before glue dries), put it in the dresser and check to see if it is aligned with the first drawer. Make adjustments if necessary. I think this is an important step as you want to make sure the trims on the two drawers line up.

4. Fill in the drawer holes from the first drawer with wood filler. Let dry and sand smooth. 

Now let’s prep for paint:

1. I lightly sanded the entire cabinet using 220 Grit sand paper to make sure the unit was smooth to touch. You can do this by hand or with an orbit sander. The higher the number is on the sand paper, the smoother the finish!

2. I wiped down the entire unit with a dry cloth to remove any debris. 

3. I applied 2 coats of primer on the entire unit using primer I had from previous projects. Make sure you let the first coat dry completely before applying the second coat. 

4. Once the primer was dry, I applied 2 coats of paint. I used Sculptor Clay from @behrpaint. It is the perfect shade of greige. Again, allow each coat to dry before applying the next. 

5. Once everything is dry, add legs and hardware. To keep cost minimal, I used legs that I had from previous projects. I had the Hedvig Little 160 in brass from from Pretty Peg. It is a bit tall for this nightstand but I wanted to use what I already had. For hardware, I found a few great options but ended with this one

Here is the total cost breakdown:

1. Cabinet – ~$40

2. Plywood for base and shelf – ~$.8.50 (only used 1/2 for 1 nightstand)

3. Trim for Drawer From – ~$29

4. Primer – $0 from before

5. Paint – $5 (I used very little from the quartz I got)

This project cost about $85 plus the cost of hardware and legs you decide to use.

Will you give this a try?


Ikea Hemnes Hack to Fluted Dresser

My most popular DIY of 2020 was definitely my Ikea Hemnes Dresser hack. I turned a very simple and popular Ikea piece of furniture into a much higher end looking (West Elm-ish) dresser. One of my favorite things about this project is that it represents what I am most passionate about, and that is sharing budget-friendly and ATTAINABLE DIYS. I strive to share projects that make you feel like YOU too can do it yourself! I want to empower you and instill confidence in your own abilities. If you like Ikea hacks, you’ll be sure to like this Ikea Patio one as well. 

For this DIY, I used:

1. 7 Ekena 3″ Fluted Trim

2. Gorilla Glue

3. A Mitre Saw or Hand saw

4. Clamps to secure the fluted trim to the front of the dresser while the glue dries

5. Brad Nail Gun

6. 12 Aluminum Britta 70 Pulls from Pretty Pegs – mine were gifted

7. Wood filler

8. Paintable Caulk

9. Paint

To create this look, I did something a bit different. I cut all of the fluted trims longer than the actual height of the drawers so it would cover the horizontal pieces of wood that separated the different levels of drawers. I also covered the vertical pieces of wood in between the smaller drawers on the top level. This created a more luxurious finish in my opinion. 

To create this look:

1.  You measure the height of each drawer on the top level plus the horizontal piece of wood. This should be the same for all 4 top drawers. 

2. Once you have your measurements, cut the fluted trims to the desired length. 

3. Use gorilla glue to start gluing each piece to the front of the drawer fronts. Make sure you account for the vertical wood pieces. You want to cover that as well so a few of the wood trims would be sticking out and not actually attached to the drawer front. 

4. Use clamps to secure the trims in place to ensure the glue will bond the trim to the drawer fronts. 


5. Once all the trims are attached and dried, cut the lattice trims to size to cover the outside rectangular edge of the dresser. 

6. Nail the lattice trims to the dresser. 

7. Once the lattice trims are nailed to the dresser, fill in the nail holes and gaps with wood filler. 

7. Use paintable caulk to cover the seams between the fluted trim. 

8. Pick  your paint color. I would lightly sand down the entire unit so the paint adheres to the dresser well. Make sure you use a high quality velvet roller when painting furniture and using high quality paint such as Benjamin Moore Advanced Interior Paint. 

9. One other thing I did to the dresser is cut off the overhang on the two sides of the dresser. This is definitely not necessary. I thought it made dresser look more complete but honestly, I think it would have been fine as is. To cut off the overhang, I removed the top of the dresser and used a circular saw with my Kreg guide for a straight cut. 

Let me know if you ever try this or if you would like to see more Ikea hacks. You can also check out the process in my Instagram highlight reel here (under Fluted Dresser).