
I know this post should have been done awhile ago, but better late than never right? I know many of you have already attempted this project by referring to my tutorial saved in my IG highlights.
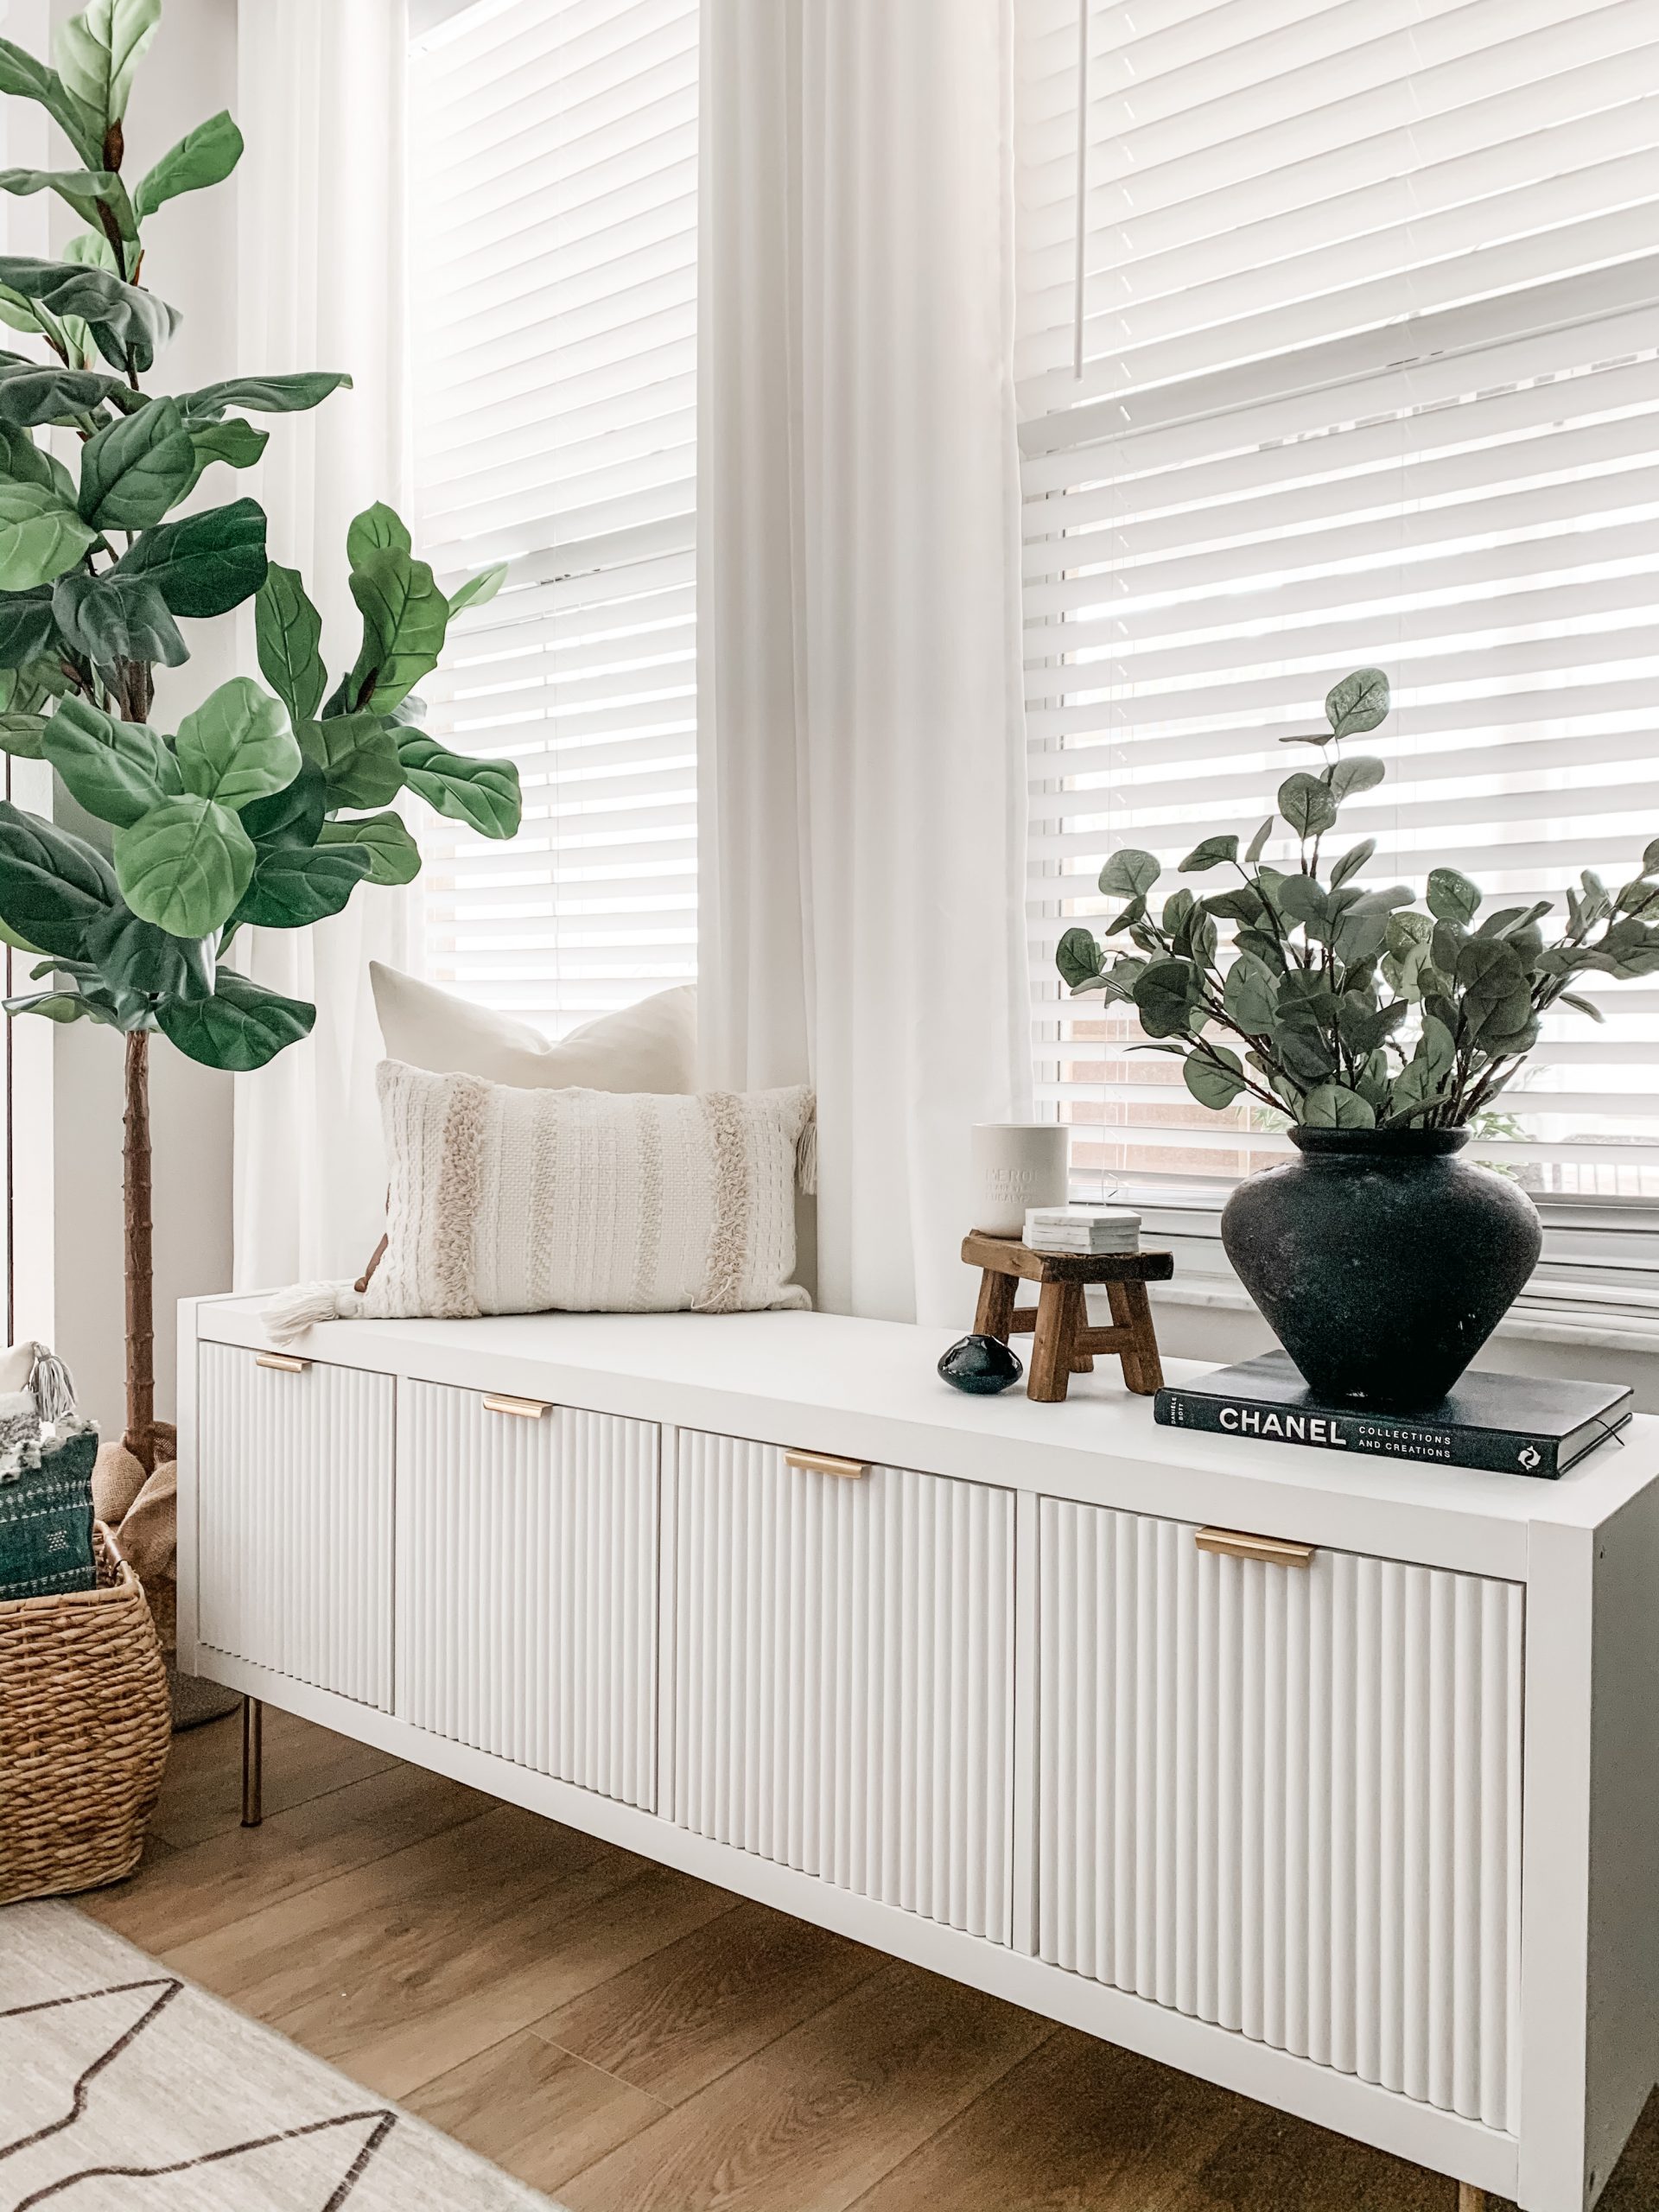
So here it is! This is how I turned my extra Ikea Kallax into a beautiful fluted Media Console.
Materials:
- Ikea Kallax
- Ikea Kallax Inserts
- Fluted Trims
- E6000 glue
- Caulk
- Mitre Saw
- Edge knobs
- Brass Legs
- Linen White Chalk Paint
- Polycrylic Matte Finish
This project began because I was reconfiguring the boys’ playroom, getting it ready for virtual learning last year during the pandemic. I ended up with an extra Ikea Kallax as there was no space for it in the playroom once I added a desk. Temporarily, I placed it in my living room under the TV with storage baskets and used it to hide my baby girl’s toys. It became a functional piece for us but aesthetically, it did not fit into our space. I stared at the unit for weeks. I kept thinking there must be something I can do to it, to make it blend into our home a little better. That was also the time when the fluted trend took off so fluted vanities, fluted dressers, pretty much fluted everything was everywhere so I decided to go with it and give it a try.
Instructions:
- I used my Mitre saw to cut the fluted trims to the height of the door. For 4 doors, I used just under 3 of the trims I purchased (they were each 8ft long). I did put through 4 cut trims though my table saw to get a thinner piece to glue to the end of each door. You can probably do this with a mitre saw or a hand saw as well.
- I used liquid nail and clamps to secure the trims to the door. However, I think E6000 or gorilla glue probably would have been better.
- I installed the legs I got from Pretty Pegs. For the front legs, I suggest installing it about 1/2 – 1 inch away from the front of the console so the black metal plate is hidden. I had to redo mine because the first time, I installed it right at the corner and the black plate was very visible.
- Once the glue was dried, I caulked the gap between the trims for a more finished look.
- I began installing the door (Kallax insert with the fluted trims) to the Ikea Kallax using the instructions provided by Ikea as a guideline. I did adjust the location of the hinges so that the door would not stick out (remember, the door is now thicker because of the added trims).
- Once everything was done, I used chalk paint and painted the entire unit (except the bottom) because no one was going to see that. I painted 1 thick coat but you can do 2 if needed.
- Once the paint was dried, I sealed it with 2 coats of Polycrylic matte sealer.
- Finally, for the the last step, I installed the edge knobs to complete the unit and voila!


Cost Breakdown:
I had the Ikea Kallax already along with many of these items listed so my cost was lower than if you had to get all of these materials. I also have power tools for various projects so I will not factor that into this cost breakdown.
- Ikea Kallax x 1 = $50
- Ikea Kallax Insert x 4 = $69
- Fluted Trims x 3 = $42
- E6000 Glue x 2 = $10 I used Liquid nail but I think you would probably need 2 tubes of E6000 glue.
- Caulk x 1 = $3 with plenty extra
- Edge knobs x 4 = $28
- Brass legs x 4 = $60
- Chalk Paint x 1 = $14 with plenty extra
- Polycrylic x 1 = $12 with plenty leftover
If you missed it, I also used the same fluted trims on my Ikea Hemnes dresser and the result was just as beautiful. You can check it out here. I also made over an Ikea Rast nightstand that can be found here.
XO,
Kim
Related Posts

How To Turned an Ikea Besta into a Fluted Credenza
I know this post should have been done awhile ago, but better late than never right? I know many of you have already attempted this project by referring to my tutorial saved in my IG highlights.
So here it is! This is how I turned my extra Ikea Kallax into a beautiful fluted Media Console.
Materials:
- Ikea Kallax
- Ikea Kallax Inserts
- Fluted Trims
- E6000 glue
- Caulk
- Mitre Saw
- Edge knobs
- Brass Legs
- Linen White Chalk Paint
- Polycrylic Matte Finish
This project began because I was reconfiguring the boys’ playroom, getting it ready for virtual learning last year during the pandemic. I ended up with an extra Ikea Kallax as there was no space for it in the playroom once I added a desk. Temporarily, I placed it in my living room under the TV with storage baskets and used it to hide my baby girl’s toys. It became a functional piece for us but aesthetically, it did not fit into our space. I stared at the unit for weeks. I kept thinking there must be something I can do to it, to make it blend into our home a little better. That was also the time when the fluted trend took off so fluted vanities, fluted dressers, pretty much fluted everything was everywhere so I decided to go with it and give it a try.
Instructions:
- I used my Mitre saw to cut the fluted trims to the height of the door. For 4 doors, I used just under 3 of the trims I purchased (they were each 8ft long). I did put through 4 cut trims though my table saw to get a thinner piece to glue to the end of each door. You can probably do this with a mitre saw or a hand saw as well.
- I used liquid nail and clamps to secure the trims to the door. However, I think E6000 or gorilla glue probably would have been better.
- I installed the legs I got from Pretty Pegs. For the front legs, I suggest installing it about 1/2 – 1 inch away from the front of the console so the black metal plate is hidden. I had to redo mine because the first time, I installed it right at the corner and the black plate was very visible.
- Once the glue was dried, I caulked the gap between the trims for a more finished look.
- I began installing the door (Kallax insert with the fluted trims) to the Ikea Kallax using the instructions provided by Ikea as a guideline. I did adjust the location of the hinges so that the door would not stick out (remember, the door is now thicker because of the added trims).
- Once everything was done, I used chalk paint and painted the entire unit (except the bottom) because no one was going to see that. I painted 1 thick coat but you can do 2 if needed.
- Once the paint was dried, I sealed it with 2 coats of Polycrylic matte sealer.
- Finally, for the the last step, I installed the edge knobs to complete the unit and voila!
Cost Breakdown:
I had the Ikea Kallax already along with many of these items listed so my cost was lower than if you had to get all of these materials. I also have power tools for various projects so I will not factor that into this cost breakdown.
- Ikea Kallax x 1 = $50
- Ikea Kallax Insert x 4 = $69
- Fluted Trims x 3 = $42
- E6000 Glue x 2 = $10 I used Liquid nail but I think you would probably need 2 tubes of E6000 glue.
- Caulk x 1 = $3 with plenty extra
- Edge knobs x 4 = $28
- Brass legs x 4 = $60
- Chalk Paint x 1 = $14 with plenty extra
- Polycrylic x 1 = $12 with plenty leftover
If you missed it, I also used the same fluted trims on my Ikea Hemnes dresser and the result was just as beautiful. You can check it out here. I also made over an Ikea Rast nightstand that can be found here.
XO,
Kim

DIY Toy Storage, Bookshelves and Desk in Kids’ Playroom
I know this post should have been done awhile ago, but better late than never right? I know many of you have already attempted this project by referring to my tutorial saved in my IG highlights.
So here it is! This is how I turned my extra Ikea Kallax into a beautiful fluted Media Console.
Materials:
- Ikea Kallax
- Ikea Kallax Inserts
- Fluted Trims
- E6000 glue
- Caulk
- Mitre Saw
- Edge knobs
- Brass Legs
- Linen White Chalk Paint
- Polycrylic Matte Finish
This project began because I was reconfiguring the boys’ playroom, getting it ready for virtual learning last year during the pandemic. I ended up with an extra Ikea Kallax as there was no space for it in the playroom once I added a desk. Temporarily, I placed it in my living room under the TV with storage baskets and used it to hide my baby girl’s toys. It became a functional piece for us but aesthetically, it did not fit into our space. I stared at the unit for weeks. I kept thinking there must be something I can do to it, to make it blend into our home a little better. That was also the time when the fluted trend took off so fluted vanities, fluted dressers, pretty much fluted everything was everywhere so I decided to go with it and give it a try.
Instructions:
- I used my Mitre saw to cut the fluted trims to the height of the door. For 4 doors, I used just under 3 of the trims I purchased (they were each 8ft long). I did put through 4 cut trims though my table saw to get a thinner piece to glue to the end of each door. You can probably do this with a mitre saw or a hand saw as well.
- I used liquid nail and clamps to secure the trims to the door. However, I think E6000 or gorilla glue probably would have been better.
- I installed the legs I got from Pretty Pegs. For the front legs, I suggest installing it about 1/2 – 1 inch away from the front of the console so the black metal plate is hidden. I had to redo mine because the first time, I installed it right at the corner and the black plate was very visible.
- Once the glue was dried, I caulked the gap between the trims for a more finished look.
- I began installing the door (Kallax insert with the fluted trims) to the Ikea Kallax using the instructions provided by Ikea as a guideline. I did adjust the location of the hinges so that the door would not stick out (remember, the door is now thicker because of the added trims).
- Once everything was done, I used chalk paint and painted the entire unit (except the bottom) because no one was going to see that. I painted 1 thick coat but you can do 2 if needed.
- Once the paint was dried, I sealed it with 2 coats of Polycrylic matte sealer.
- Finally, for the the last step, I installed the edge knobs to complete the unit and voila!
Cost Breakdown:
I had the Ikea Kallax already along with many of these items listed so my cost was lower than if you had to get all of these materials. I also have power tools for various projects so I will not factor that into this cost breakdown.
- Ikea Kallax x 1 = $50
- Ikea Kallax Insert x 4 = $69
- Fluted Trims x 3 = $42
- E6000 Glue x 2 = $10 I used Liquid nail but I think you would probably need 2 tubes of E6000 glue.
- Caulk x 1 = $3 with plenty extra
- Edge knobs x 4 = $28
- Brass legs x 4 = $60
- Chalk Paint x 1 = $14 with plenty extra
- Polycrylic x 1 = $12 with plenty leftover
If you missed it, I also used the same fluted trims on my Ikea Hemnes dresser and the result was just as beautiful. You can check it out here. I also made over an Ikea Rast nightstand that can be found here.
XO,
Kim