My parents have lived in their home for over 20 years. Other than paint, not many changes were made to their house. This year, they finished their basement so there would be extra space for my kids to hang when we visit. How sweet is that!
Holiday Gift Idea
I was strugging to find a gift for them this Holiday season, which I do every year. They are the kind of parents that NEVER want their children to “waste” money on them. I know they have talked about updating their house for awhile, but since nothing is “broken”, they will wait a bit longer. My parents’ house may be a tad dated, but everything is in phenomenal condition, so who knows when that will be! While I was lying on their couch sick one day (during our trip to Toronto over the holidays), I came up with the idea of gifting them a little update to their home. I decided to create box molding on their living room walls. I thought it would be a fairly easy project that I could tackle in a few days while creating a huge impact. So I texted a few family members to see what tools I could borrow and off to Home Depot I went.
1.First, determine the design you want. I chose to have a large rectangular box on top and then a smaller box underneath.
2.Then measure the wall(s) to determine height and width of the wall(s).
3.Determine the size of the boxes you wish to build (based on preference). My layout provided below.
4. Optional but recommended: Use painter’s tape to tape the size of the boxes on the wall. This takes the guessing game out of the project. Once the tape is on the wall, you make changes based on your personal preference.
5.Create a cut list (eg. 8 x 57″)
6.Using a miter saw/miter box to cut your trims at a 45 degree angle. Label and group them together so you don’t mix them up later during installation. This makes the process a lot smoother when nailing into the wall
7.With a nail gun, start installing your trims. If you have a laser level, this would be a great opporuntiy to bring it out. If not, a manual level works just fine. Start with the top trim and work your way from one side of the wall to the other. My parents live alone. My nieces and nephews are older so there is no concern with someone trying to pull the trims off the wall. If this is a concern, you can nail the trims to studs. But in our case, the 1 ¼” nails plus caulking is sufficient to hold the trims in place.
8.Once the trims are installed, it’s time to fill in those nail holes with wood filler.
9.It’s all in the details. One the nail holes are filled, I caulked around the edges of the trims (both on the ouside and inside) so there aren’t any visible gaps.
10.Once everything is dry, I painted it with 2 coats of Behr Whispering White in a matte finish. It instantly made the room feel larger and the ceiling taller.
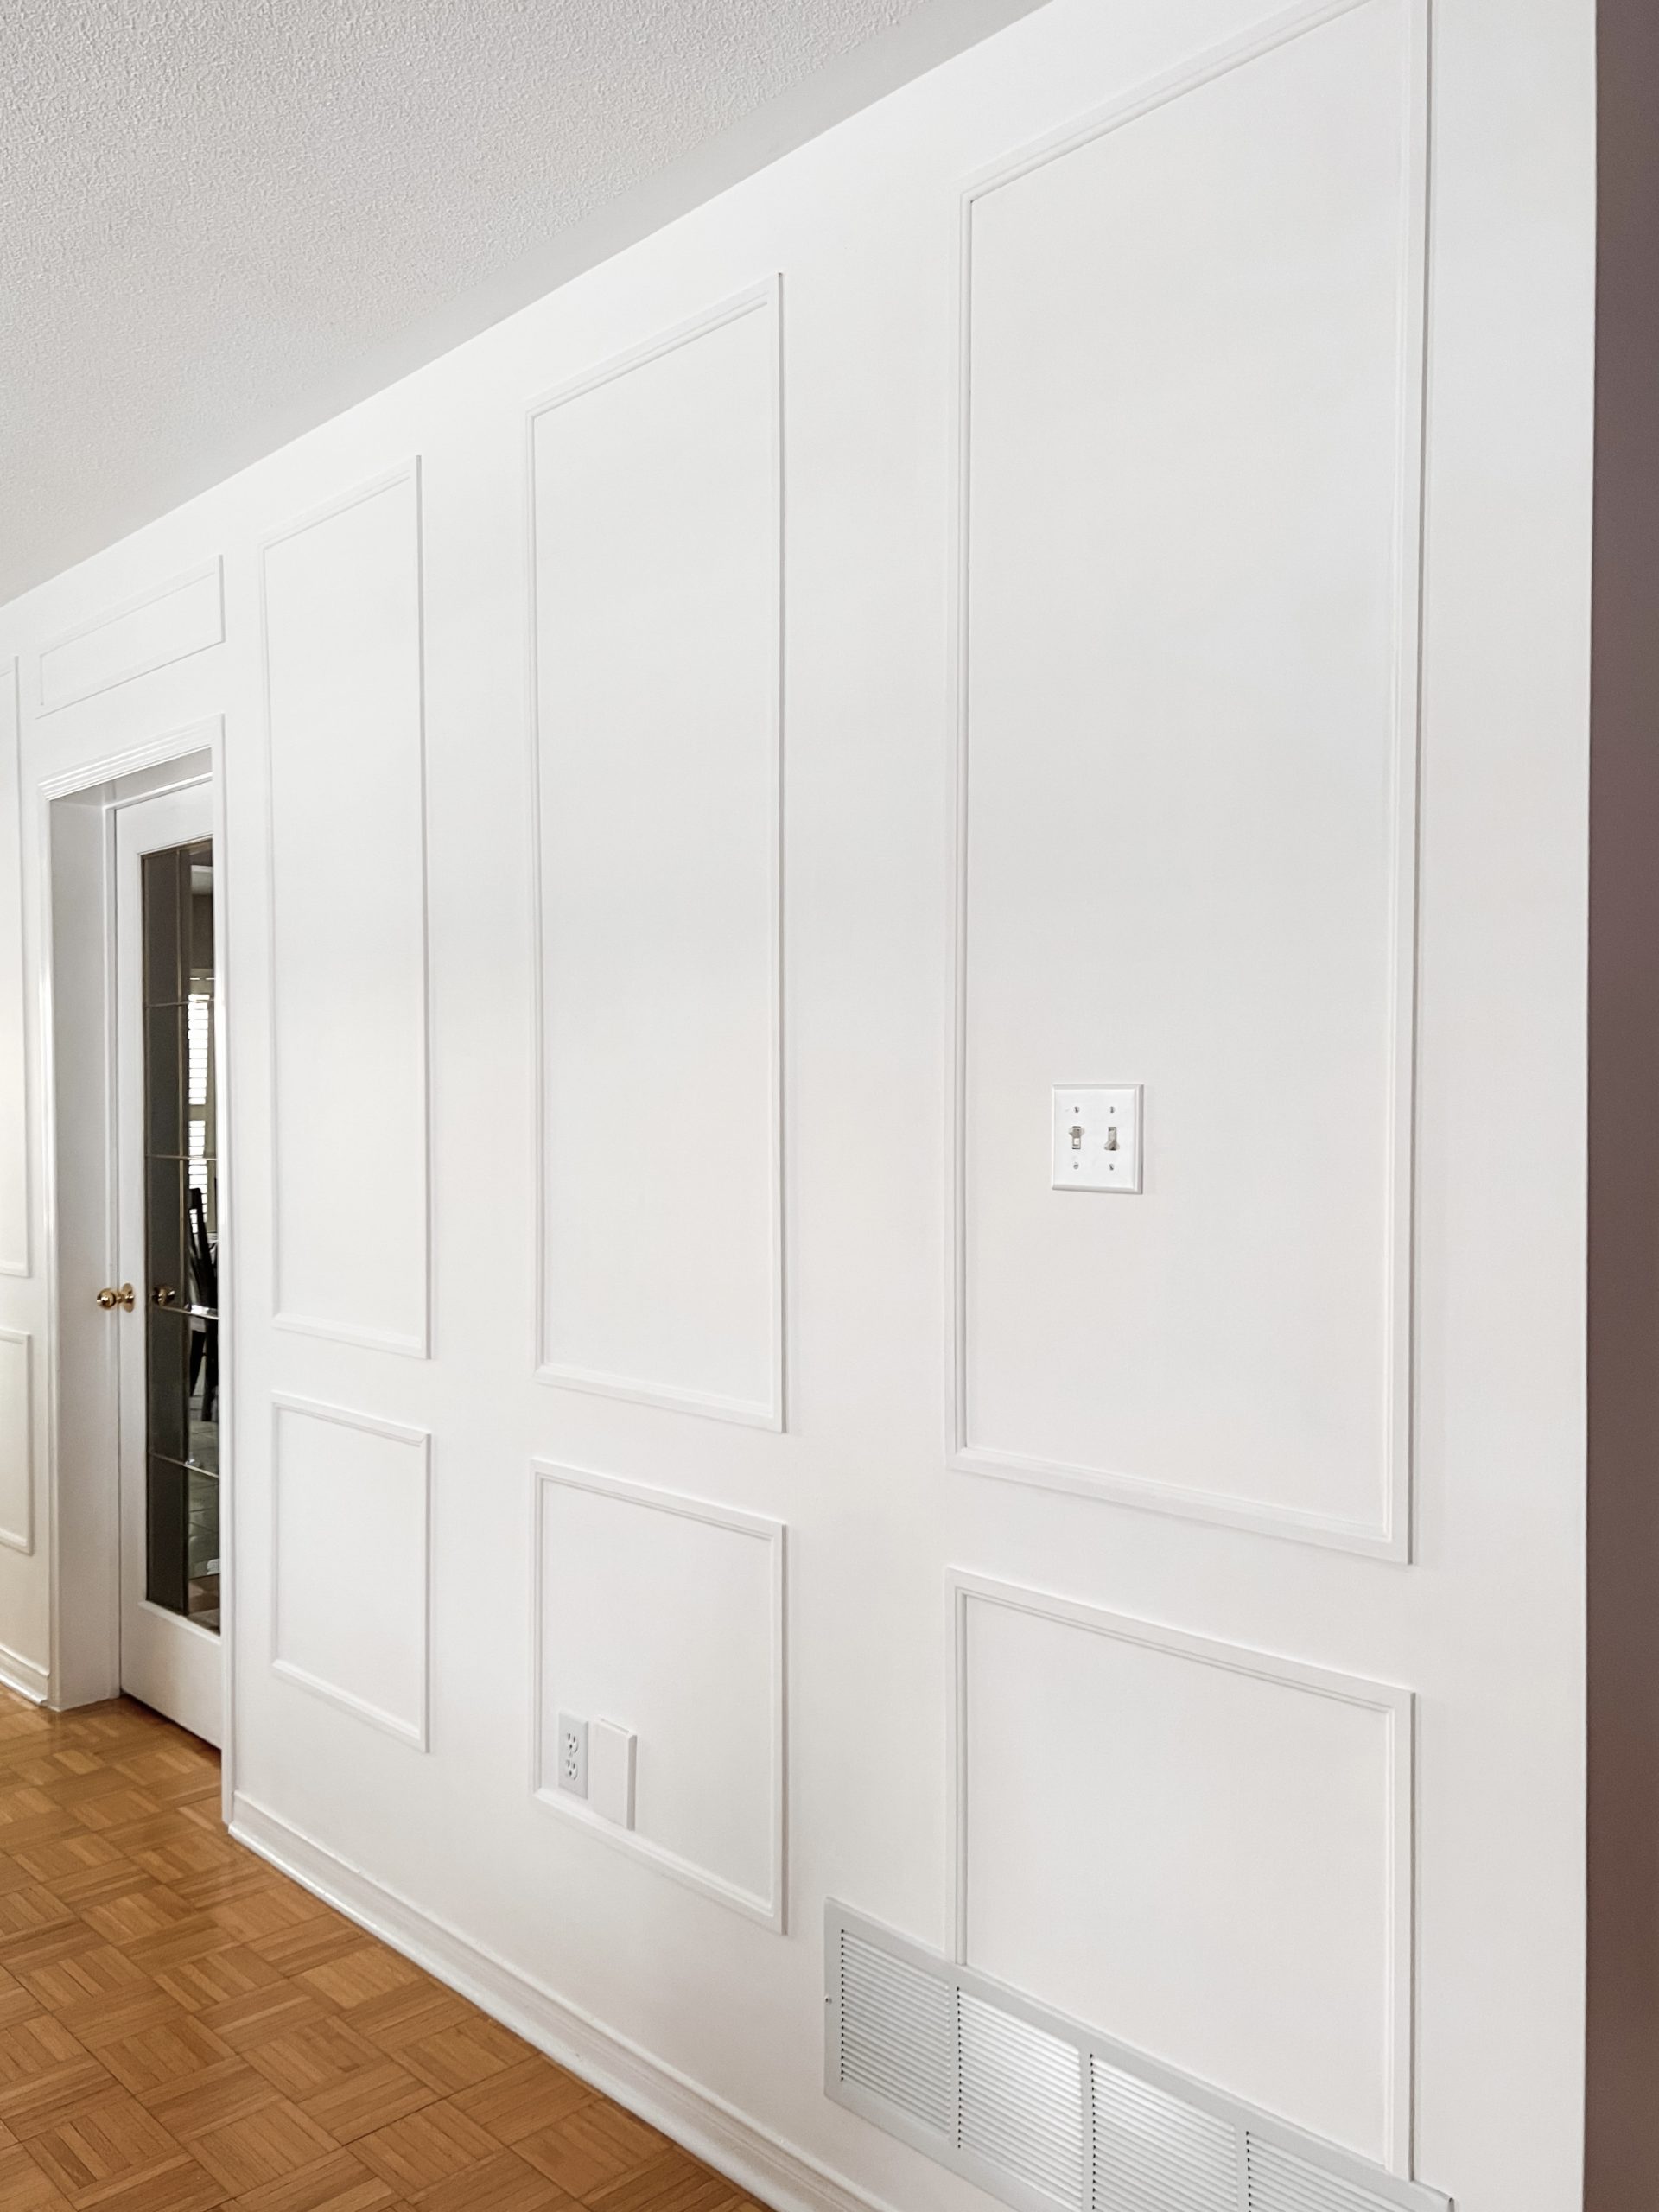
This entire project took me 2 days to complete, from start to finish. I even did the wall opposite to the one in the picture below.
AFTER:
Total Cost (for this wall):
US Cost:
Trims: 11x 4.10 = $45.1
1 can of paint: $41.98
Wood filler – $5.38
Caulking – 3.48
1 ¼” brad nail – 6.98
Total: $102.92 + applicable taxes
Canadian Cost:
Trims 11 x 12.80 = $140.90
1 can of paint = $57.95
Wood filler = 5.27
Caulking – $3.54
1 ¼’ brad nail – $7.48 (only 1/5 of it)
Total: $215.14 plus taxes
I am so happy with how this project turned out. It completely transformed the space. My parents are very practical people, so this is not something they would typically spend money on. However, they love how it looks and I am thrilled I was able to do this for them. In the end, this made a fantastic Christmas gift for them. This is a fairly easy DIY project. if you are looking for more DIY projects, check this project and this project. If you try this, let me know how it goes.
My parents have lived in their home for over 20 years. Other than paint, not many changes were made to their house. This year, they finished their basement so there would be extra space for my kids to hang when we visit. How sweet is that!
Holiday Gift Idea
I was strugging to find a gift for them this Holiday season, which I do every year. They are the kind of parents that NEVER want their children to “waste” money on them. I know they have talked about updating their house for awhile, but since nothing is “broken”, they will wait a bit longer. My parents’ house may be a tad dated, but everything is in phenomenal condition, so who knows when that will be! While I was lying on their couch sick one day (during our trip to Toronto over the holidays), I came up with the idea of gifting them a little update to their home. I decided to create box molding on their living room walls. I thought it would be a fairly easy project that I could tackle in a few days while creating a huge impact. So I texted a few family members to see what tools I could borrow and off to Home Depot I went.
1.First, determine the design you want. I chose to have a large rectangular box on top and then a smaller box underneath.
2.Then measure the wall(s) to determine height and width of the wall(s).
3.Determine the size of the boxes you wish to build (based on preference). My layout provided below.
4. Optional but recommended: Use painter’s tape to tape the size of the boxes on the wall. This takes the guessing game out of the project. Once the tape is on the wall, you make changes based on your personal preference.
5.Create a cut list (eg. 8 x 57″)
6.Using a miter saw/miter box to cut your trims at a 45 degree angle. Label and group them together so you don’t mix them up later during installation. This makes the process a lot smoother when nailing into the wall
7.With a nail gun, start installing your trims. If you have a laser level, this would be a great opporuntiy to bring it out. If not, a manual level works just fine. Start with the top trim and work your way from one side of the wall to the other. My parents live alone. My nieces and nephews are older so there is no concern with someone trying to pull the trims off the wall. If this is a concern, you can nail the trims to studs. But in our case, the 1 ¼” nails plus caulking is sufficient to hold the trims in place.
8.Once the trims are installed, it’s time to fill in those nail holes with wood filler.
9.It’s all in the details. One the nail holes are filled, I caulked around the edges of the trims (both on the ouside and inside) so there aren’t any visible gaps.
10.Once everything is dry, I painted it with 2 coats of Behr Whispering White in a matte finish. It instantly made the room feel larger and the ceiling taller.
This entire project took me 2 days to complete, from start to finish. I even did the wall opposite to the one in the picture below.
AFTER:
Total Cost (for this wall):
US Cost:
Trims: 11x 4.10 = $45.1
1 can of paint: $41.98
Wood filler – $5.38
Caulking – 3.48
1 ¼” brad nail – 6.98
Total: $102.92 + applicable taxes
Canadian Cost:
Trims 11 x 12.80 = $140.90
1 can of paint = $57.95
Wood filler = 5.27
Caulking – $3.54
1 ¼’ brad nail – $7.48 (only 1/5 of it)
Total: $215.14 plus taxes
I am so happy with how this project turned out. It completely transformed the space. My parents are very practical people, so this is not something they would typically spend money on. However, they love how it looks and I am thrilled I was able to do this for them. In the end, this made a fantastic Christmas gift for them. This is a fairly easy DIY project. if you are looking for more DIY projects, check this project and this project. If you try this, let me know how it goes.
How would you handle doing this project on walls that have imperfections and orange peel texture?
xomyhome
|
28th Dec 21
Hi! I would add hardboard to the walls prior to adding the trims. You will need to plan your layout in advance and determine where you would like the trims to be (similar to the diagram I shared). The goal is to have the trims hide as much of the seams where the hardboards meet as possible.
Roxy
|
28th Dec 21
Hi
This looks absolutely AMAZING! I am extremely nervous to take up a project like this but so tempted at the same time. what would you recommend to attach the trimming if walk is concrete as no nails will sit.
xomyhome
|
5th Jan 22
YOU CAN DO IT! Trust me, I was never a handy person and have made my fair share of mistakes but it’s ok! You learn in the process. I would try a strong adhesive first and see if that would work.
Tianna Hamlett
|
12th Jan 22
Hi! This is amazing. I would love to use it to improve the space in my home but I’m certainly not as handy! This could be a silly question but how did you place the nails and still get such a seamless finish? Is it just paint over them? Thank you for the inspiration!
xomyhome
|
12th Jan 22
I nailed the trim to the wall and then filled it with wood filler and then caulked around the edges before painting for a more seamless and finished look.


Molly | 28th Dec 21
How would you handle doing this project on walls that have imperfections and orange peel texture?
xomyhome | 28th Dec 21
Hi! I would add hardboard to the walls prior to adding the trims. You will need to plan your layout in advance and determine where you would like the trims to be (similar to the diagram I shared). The goal is to have the trims hide as much of the seams where the hardboards meet as possible.
Roxy | 28th Dec 21
Hi
This looks absolutely AMAZING! I am extremely nervous to take up a project like this but so tempted at the same time. what would you recommend to attach the trimming if walk is concrete as no nails will sit.
xomyhome | 5th Jan 22
YOU CAN DO IT! Trust me, I was never a handy person and have made my fair share of mistakes but it’s ok! You learn in the process. I would try a strong adhesive first and see if that would work.
Tianna Hamlett | 12th Jan 22
Hi! This is amazing. I would love to use it to improve the space in my home but I’m certainly not as handy! This could be a silly question but how did you place the nails and still get such a seamless finish? Is it just paint over them? Thank you for the inspiration!
xomyhome | 12th Jan 22
I nailed the trim to the wall and then filled it with wood filler and then caulked around the edges before painting for a more seamless and finished look.